Architecture
Table of Contents:
1 Master Components
Master components provide the cluster’s control plane. Master components make global decisions about the cluster (for example, scheduling), and detecting and responding to cluster events (starting up a new pod when a replication controller’s ‘replicas’ field is unsatisfied).
Master components can be run on any machine in the cluster. However, for simplicity, set up scripts typically start all master components on the same machine, and do not run user containers on this machine. See Building High-Availability Clusters for an example multi-master-VM setup.
1.1 kube-apiserver
Component on the master that exposes the Kubernetes API. It is the front-end for the Kubernetes control plane.
It is designed to scale horizontally – that is, it scales by deploying more instances. See Building High-Availability Clusters.
1.2 etcd
Consistent and highly-available key value store used as Kubernetes’ backing store for all cluster data.
Always have a backup plan for etcd’s data for your Kubernetes cluster. For in-depth information on etcd, see etcd documentation.
1.3 kube-scheduler
Component on the master that watches newly created pods that have no node assigned, and selects a node for them to run on.
The scheduler identifies the right note to place a container on based on the containers’ resource requirements, the worker nodes capacity or any other policies or constraints such as tents and tolerations or node affinity rules that are on them.
Factors taken into account for scheduling decisions include individual and collective resource requirements, hardware/software/policy constraints, affinity and anti-affinity specifications, data locality, inter-workload interference and deadlines.
1.4 kube-controller-manager
Component on the master that runs controllers.
Logically, each controller is a separate process, but to reduce complexity, they are all compiled into a single binary and run in a single process.
These controllers include:
- Node Controller: Responsible for noticing and responding when nodes go down.
- Replication Controller: Responsible for maintaining the correct number of pods for every replication controller object in the system.
- Endpoints Controller: Populates the Endpoints object (that is, joins Services & Pods).
- Service Account & Token Controllers: Create default accounts and API access tokens for new namespaces.
1.5 cloud-controller-manager
cloud-controller-manager runs controllers that interact with the underlying cloud providers. The cloud-controller-manager binary is an alpha feature introduced in Kubernetes release 1.6.
2 Nodes
A node is a worker machine in Kubernetes, previously known as a minion. A node may be a VM or physical machine, depending on the cluster. Each node contains the services necessary to run pods and is managed by the master components. The services on a node include the container runtime, kubelet and kube-proxy.
2.1 Node Components
Node components run on every node, maintaining running pods and providing the Kubernetes runtime environment.
2.2 kubelet
An agent that runs on each node in the cluster. It makes sure that containers are running in a pod.
The kubelet takes a set of PodSpecs that are provided through various mechanisms and ensures that the containers described in those PodSpecs are running and healthy. The kubelet doesn’t manage containers which were not created by Kubernetes.
2.2.1 Static Pod
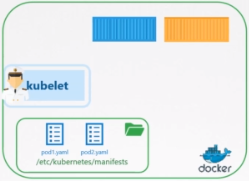
You can configure the kubelet to read the pod definition files from a directory on the node designated to store information about pods. The directory could be any directory on the host and the location of that directory (pod-manifest-path) is passed in to the kubelet.
The Kubelet periodically checks this directory and reads these files and creates pods on the host.
Not only does it create the pod it can ensure that the pod stays alive. If the application crashes, the kubelet attempts to restart it.
If you make a change to any of the file within this directory, the kubelet recreates the pod for those changes to take effect. If you remove a file from this directory the related pod is deleted automatically. So these PODs that are created by the kubelet on its own without the intervention from the API server.
So these PODs that are created by the kubelet on its own without the intervention from the API server or rest of the kuberentes cluster components are known as Static PODs.
2.2.2 Pod-Manifest-Path
There are two ways to configure it.
- Configure the option of kubelet service (pod-manifest-path)
- Configure the option of kubelet service(kubeconfig, a config file)
2.2.3 Relation to KPI Server
The kubelet can create both kinds of PODs – the staticpods and the ones from the api server - at the same time. The API server is aware of the static pods created by the kubelet. If you run the kubectl get pods command on the master node, the static pods will be listed as any other pod.
When the kubelet creates a static pod, if it is part of a cluster, it also creates a mirror object in the kubeapi server. What you see from the kube-apiserver is just a read only mirror of the pod. You can view details about the pod but you cannot edit or delete it like the usual parts. You can only delete them by modifying the files from the nodes manifest folder.
Since static pods are not dependent on the Kubernetes control plane, you can use static pods to deploy the control plane components itself as pods on a node. Place the definition files of control plane components in the designated manifests folder. And kubelet takes care of deploying the control plane components themselves as PODs on the cluster. If any of these services were to crash since it's a static pod it will automatically be restarted by the kubelet. That’s how the kubeadmin tool set’s up a Kubernetes cluster.
2.3 kube-proxy
kube-proxy enables the Kubernetes service abstraction by maintaining network rules on the host and performing connection forwarding.
2.4 Container Runtime
The container runtime is the software that is responsible for running containers. Kubernetes supports several runtimes: Docker, containerd, cri-o, rktlet and any implementation of the Kubernetes CRI (Container Runtime Interface).
2.5 Management
Unlike pods and services, a node is not inherently created by Kubernetes: it is created externally by cloud providers like Google Compute Engine, or it exists in your pool of physical or virtual machines. So when Kubernetes creates a node, it creates an object that represents the node. After creation, Kubernetes checks whether the node is valid or not. For example, if you try to create a node from the following content:
{
"kind": "Node",
"apiVersion": "v1",
"metadata": {
"name": "10.240.79.157",
"labels": {
"name": "my-first-k8s-node"
}
}
}
Kubernetes creates a node object internally (the representation), and validates the node by health checking based on the metadata.name field. If the node is valid – that is, if all necessary services are running – it is eligible to run a pod. Otherwise, it is ignored for any cluster activity until it becomes valid.
Note: Kubernetes keeps the object for the invalid node and keeps checking to see whether it becomes valid. You must explicitly delete the Node object to stop this process.
Currently, there are three components that interact with the Kubernetes node interface: node controller, kubelet, and kubectl.
2.5.1 Node Controller
The node controller is a Kubernetes master component which manages various aspects of nodes.
2.5.1.1 Monitoring the nodes’ health
The node controller is responsible for updating the NodeReady condition of NodeStatus to ConditionUnknown (The default timeouts are 40s) when a node becomes unreachable. It checks the state of each node every --node-monitor-period seconds.
2.5.1.2 Evict unhealthy nodes
If the Status of the Ready condition remains Unknown or False for longer than the pod-eviction-timeout, an argument is passed to the kube-controller-manager and all the Pods on the node are scheduled for deletion by the Node Controller. The default eviction timeout duration is five minutes. In some cases when the node is unreachable, the apiserver is unable to communicate with the kubelet on the node. The decision to delete the pods cannot be communicated to the kubelet until communication with the apiserver is re-established. In the meantime, the pods that are scheduled for deletion may continue to run on the partitioned node.
In 1.5 and higher, the node controller does not force delete pods until it is confirmed that they have stopped running in the cluster. You can see the pods that might be running on an unreachable node as being in the Terminating or Unknown state. In cases where Kubernetes cannot deduce from the underlying infrastructure if a node has permanently left a cluster, the cluster administrator may need to delete the node object by hand. Deleting the node object from Kubernetes causes all the Pod objects running on the node to be deleted from the apiserver, and frees up their names.
2.5.1.2.1 Eviction Rate
In most cases, node controller limits the eviction rate to --node-eviction-rate (default 0.1) per second, meaning it won’t evict pods from more than 1 node per 10 seconds.
The node eviction behavior changes when a node in a given availability zone becomes unhealthy. The node controller checks what percentage of nodes in the zone are unhealthy (NodeReady condition is ConditionUnknown or ConditionFalse) at the same time. If the fraction of unhealthy nodes is at least --unhealthy-zone-threshold (default 0.55) then the eviction rate is reduced: if the cluster is small (i.e. has less than or equal to --large-cluster-size-threshold nodes - default 50) then evictions are stopped, otherwise the eviction rate is reduced to --secondary-node-eviction-rate (default 0.01) per second. The reason these policies are implemented per availability zone is because one availability zone might become partitioned from the master while the others remain connected. If your cluster does not span multiple cloud provider availability zones, then there is only one availability zone (the whole cluster).
A key reason for spreading your nodes across availability zones is so that the workload can be shifted to healthy zones when one entire zone goes down. Therefore, if all nodes in a zone are unhealthy then node controller evicts at the normal rate --node-eviction-rate. The corner case is when all zones are completely unhealthy (i.e. there are no healthy nodes in the cluster). In such case, the node controller assumes that there’s some problem with master connectivity and stops all evictions until some connectivity is restored.
2.5.1.3 TaintNodesByCondition
In version 1.12, TaintNodesByCondition feature is promoted to beta, so node lifecycle controller automatically creates taints that represent conditions. Similarly the scheduler ignores conditions when considering a Node; instead it looks at the Node’s taints and a Pod’s tolerations.
Now users can choose between the old scheduling model and a new, more flexible scheduling model. A Pod that does not have any tolerations gets scheduled according to the old model. But a Pod that tolerates the taints of a particular Node can be scheduled on that Node.
2.5.2 Self-Registration of Nodes
When the kubelet flag --register-node is true (the default), the kubelet will attempt to register itself with the API server. This is the preferred pattern, used by most distros.
2.5.3 Manual Node Administration
A cluster administrator can create and modify node objects.
If the administrator wishes to create node objects manually, set the kubelet flag --register-node=false.
The administrator can modify node resources (regardless of the setting of --register-node). Modifications include setting labels on the node and marking it unschedulable.
Labels on nodes can be used in conjunction with node selectors on pods to control scheduling, e.g. to constrain a pod to only be eligible to run on a subset of the nodes.
2.5.3.1 Unschedule Node
Marking a node as unschedulable prevents new pods from being scheduled to that node, but does not affect any existing pods on the node. This is useful as a preparatory step before a node reboot, etc. For example, to mark a node unschedulable, run this command:
kubectl cordon $NODENAME
2.5.4 Node capacity
The capacity of the node (number of cpus and amount of memory) is part of the node object. Normally, nodes register themselves and report their capacity when creating the node object. If you are doing manual node administration, then you need to set node capacity when adding a node.
The Kubernetes scheduler ensures that there are enough resources for all the pods on a node. It checks that the sum of the requests of containers on the node is no greater than the node capacity. It includes all containers started by the kubelet, but not containers started directly by the container runtime nor any process running outside of the containers.
If you want to explicitly reserve resources for non-Pod processes, follow this tutorial to reserve resources for system daemons.
3 Addons
Addons are pods and services that implement cluster features. The pods may be managed by Deployments, ReplicationControllers, and so on. Namespaced addon objects are created in the kube-system namespace.
Selected addons are described below, for an extended list of available addons please see Addons.
3.1 DNS
While the other addons are not strictly required, all Kubernetes clusters should have cluster DNS, as many examples rely on it.
Cluster DNS is a DNS server, in addition to the other DNS server(s) in your environment, which serves DNS records for Kubernetes services.
Containers started by Kubernetes automatically include this DNS server in their DNS searches.
3.2 Web UI (Dashboard)
Dashboard is a general purpose, web-based UI for Kubernetes clusters. It allows users to manage and troubleshoot applications running in the cluster, as well as the cluster itself.
3.3 Container Resource Monitoring
Container Resource Monitoring records generic time-series metrics about containers in a central database, and provides a UI for browsing that data.
3.4 Cluster-level Logging
A Cluster-level logging mechanism is responsible for saving container logs to a central log store with search/browsing interface.
